Feeds:
Posts
Comments

I’ve finally gotten around to writing about how to use a tracing wheel (effectively, that is)…but instead of re-posting it all here (it’s a little long!), I’ll send you over to the new site, if you’d like to see it!

Picture

http://www.themodernseamstress.com/use-a-tracing-wheel-and-tracing-paper.html

Ahh, Cricut.

Instead of working on new sewing-related pages for this site, I have been all-consumed by my new Cricut.  I am not a scrapbooker, but I am a crafter who loves gadgets!! So far, I have used my Cricut to make labels for jars/baskets, to cut out fabric, and even to decorate itself!
Picture

A plethora of labels! Laminated so I can use them with a dry-erase marker!
Picture

Dry-erase labels in action!
Picture

Obviously, I always want to know where my candy is.
Picture

I cut the tan and gold swirls out with the Cricut for this horse show shirt. Later, I embellished the whole thing with cut crystals.
Picture

I used the Cricut to cut swirls out of adhesive vinyl to decorate itself! 🙂

New Site!

The Modern Seamstress has a new home, though it’s still in progress.

http://www.themodernseamstress.com

I’m pretty excited about it! I think it will be a better format, and I will try to be better about keeping up with the blog over there…but I’ve decided to continue to update this one as well 🙂

I hope you get a chance to visit the new site!

Miracle Marker ChalkMiracle Marker Chalk Powder

Shopping around on JoAnn.com, I was very happy to find a few more iron-off marking powders and tools: Miracle Marker Chalk!  I love the Ultimate Pounce Powder, but I believe it’s only available at quilt shops.  Both of these products are only available online through JoAnn’s, but I am so in love with iron-off powders, that I think they’re worth it!

PREzyHemSetI was at my local Jo-Ann Fabrics recently and I came across this cool measuring set!  It has an Ezy-Hem, a nice, sturdy seam gauge with point for turning out corners, and a 60″ tape measure with a D-ring end.  I didn’t catch the price, but I love a good tool set, especially one with such good tools!

Marking Tools

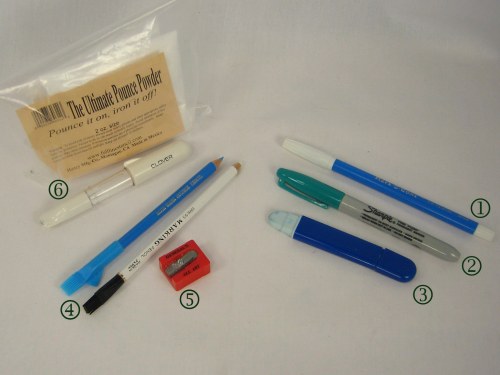
markingtoolsGood marking tools can help make a project much easier to complete.  Here are the marking tools that I use the most often:

1. Water Soluble Pen: The ink of this marker disappears in cool water, so it’s great for cottons and other washable fabrics.  The ink usually will soak through layers of fabric, which can be good if you’re marking darts, and not so good…well, if you don’t want your marks to show through.  To remove marks, I spritz with a spray bottle or run under the faucet.  Make sure you let the fabric air dry completely before ironing, or the heat might set the marks.  Another tip: if the pen begins to dry out, open up the end, and drop some water into the barrel; soak the tip in water as well .  Usually, this will bring the pen back to life, at least long enough until the next time you can get to the craft store!

2. Permanent Marker: This might seem like the opposite of any marking tool you would want in your sewing room, but if you’re marking someplace that will be completely hidden (like cutting lines), a permanent marker is good because the ink won’t run or stain the rest of your project after washing and using.  Just be careful that you really put the marks where you mean to and that the ink doesn’t soak onto anything you don’t want it to!  (I also like to mark all my sewing tools with my name or initials so that when sewing with friends, we never mix up our notions!)

3. Slim Chaco-Liner: This particular product is made by Clover, though there are probably other brands.  This nifty tool has a wheel that dispenses powder chalk onto your project.  It’s nice for creating thin lines that are usually easy to brush off, and often they will get your chalk onto hard to mark fabric like fleece. They come in white, blue, yellow, and red (and maybe even more!)

4. Dressmaker’s Pencil: These dressmaker’s pencils are often chalk and usually water soluble.  I usually only use them on marks that won’t be seen, but because they are chalk, if you mark on the wrong side of the fabric, the marks usually won’t show through to the front side of your project.  When you sharpen the tips to a point, you can make very precise marks.

5. General’s All Art Sharpener:  This is my favorite sharpener because it creates perfect points like when your pencils were new!  I find them in the fine arts department of my local craft store.

6. Pen-Style Clover Chaco-Liner and Ultimate Pounce Powder: This combination of marking tools is hands down my favorite and most used marking tool.  I bought a Clover Pen-Style Chaco-Liner (because it’s a different shape than all my Slim Chaco-Liners and therefore easy to distinguish; also it has a clear barrel so I can see when it needs to be refilled) and dumped the chalk the came with it.  Then I filled the barrel with the Ulitmate Pounce Powder: a white, iron-off powder!  This is a great system because the Chaco-Liner can draw nice lines on almost any fabric, but the Pounce Powder irons off, so there’s no need to get your fabric wet!  Of course, I would always test before using it all over a project, but I’ve used this system on everything from satin and chiffon to fleece and canvas.  Unfortunately, it only comes in white, but usually that’s okay (and I have used it on white fabric before…it was hard to see, but I did it!)
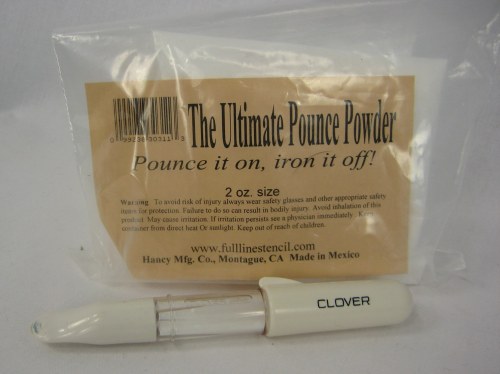
PouncePowder+Pen(This is a picture of The Ultimate Pounce Powder refill and the Pen Style Chaco-Liner.  The Pounce Powder is a quilting tool that comes with an actual pouncer, but I can’t currently find mine!  I will post a picture as soon as I do.) 🙂

Cutting Tools

cuttingtools-2

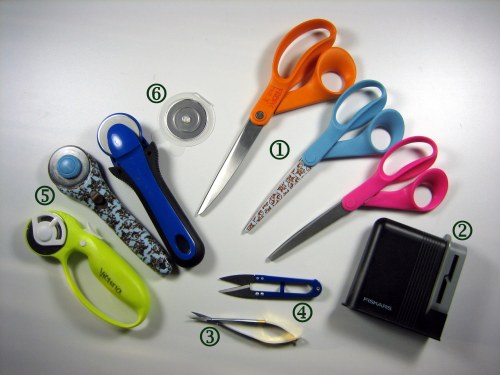
I have cutting tools up the wazoo in my sewing room.  These are not the only cutting implements I have or use, but these are the ones I use the most frequently:

1.  Fiskars Scissors:  I have a few large 9 1/2″ pairs of these (the orange ones shown) and then probably 7 pairs of the 8″ scissors (like the pink and blue handled shown…mostly hot pink: easier to find in the mess that is my sewing room).  Many pairs are marked “FABRIC ONLY” and one or two pairs are designated for paper.  I like these Fiskars because they are good scissors:  higher quality than the cheaper store brands, but not as expensive as Gingher scissors (and therefore I don’t feel guilty using them).  The larger pairs are good for cutting through layers of thick fleece or denim, but most of the time I am happy with the 8″ pairs.  What really makes them my favorite is my ability to sharpen them quickly and easily with the Fiskars Scissor Sharpener (see #2 below).

2.  Fiskars Scissor Sharpener:  This handy dandy tool is the key to easy fabric slicing!  It doesn’ t matter how great your scissors are, if they’re dull, they won’t cut.  I have two of these sharpeners and all you have to do is make a cutting motion with your scissor blades in the slots (real directions are on the package of course) and your Fiskars scissors are like new again, ready to cut through anything!!

3.  Curved Tip Embroidery Scissors:  These come in several brands (I own some called “Easy-Kut” and “Snip-Eze”).  I like the small curved tip for cutting threads nice and close to the fabric, whether they’re in embroidery designs or hems.  My favorite part of these particular scissors is that they’re a little like tweezers, always open, with no finger loops.  It’s so easy to do quick snips without having to slip your fingers into little holes.  It may not seem like a big deal until you try these! Then you’ll love them!

4.  Thread Snips:  I found a few pairs of these for only a dollar or two a piece and I keep a pair next to each of my sergers.  They’re excellent for clipping threads, again with no finger holes to slow you down.

5.  Rotary Cutters:  I must have 7  rotary cutters now.  Sometimes it’s because I lose them, but some have different functions.  I keep a cutter that’s for paper separate from my fabric cutters.  Rotary cutters come in different sizes, but I pretty much exclusively use the 45mm size.  Some rotary cutters are more ergonomically shaped  and the blade locks in place (the yellow Fiskars), some are cuter (the blue and brown damask Fiskars), and some have a nifty retractable blade that comes out automatically when you press it to the cutting surface (the blue Dritz).  I started using rotary cutters when I began quilting, but lately, I’ve also been using them to cut out dress patterns as well.  They give a nice, straight, clean cut without lifting the fabric from the table/cutting surface, like you need to do with scissors.  They’re best when used with a self-healing mat (you don’t want to ruin your table!) and a proper rotary-cutting ruler.  Be careful not to slice off the tips of your fingers!

6.  New Rotary Cutting Blades:  Like scissors, a rotary cutter won’t work well if the blades are dull.  I buy new blades in multi-packs when they’re on sale so I can always have new ones around.  A new rotary blade cuts through almost any fabric (layers, even!) like butter.  So fabulous!  There is a rotary blade sharpener available as well (and I own it), and I’ve found it’s good for taking burrs and other little imperfections out of your blade to make it last a little longer, but nothing (I’ve found) is as good as a nice new rotary blade when you need one.

Again, I can’t stress enough that I have multiples of all these things because I buy them on sale and it makes my life easier.  Do I need them all? Probably not.  Am I happy when a pair of scissors is always within reach? Absolutely!!  The few dollars I spend on each extra/multiple cutting tool is worth it so that I can always find the right tool that I need! 🙂

Measuring Tools

I thought I’d start off with a list of basic tools that I pretty much can’t live without in my sewing room.  I’ll probably go into more detail at some time about how specifically I use them and how specifically I cannot do without them, but here’s an overview:

1. Seam Gauge: This is a handy-dandy 6″ ruler that comes in most starter sewing kits.  It’s nice because it’s small and light and perfect for keeping right by your sewing machine to check seams, mark hems, darts, etc.  The little slider on it holds your place for easy hem or line marking.  I have about 5 of these because one is never where you want it (usually underneath some other part of the project).

2. Soft Tape Measure: These standard sewing tape measures also come in most sewing kits and I probably have 6 in use all over the sewing room so one is always in easy reach.  Use for measuring bodies, patterns, just about anything!

3. Retractable Tape Measure: These are extra handy because they take up less space and neat because they retract.  I’ve taken to carrying one in my purse and it’s come in handy for measuring furniture, table lamps, boxes, etc.  I also love them because they come in all kinds of cute forms (like the chicken one with an egg for the tape pull).  (They’re a cute gift idea for any seamstress in your life!)

4. Rotary Cutting Ruler: Until I started quilting, I never had or used these, but now, I use them for everything.  I have 2 each of the sizes pictured (6″ x 12″ and 3″ x 18″) and more sizes to boot.  I use these for precise measuring and cutting on lots of craft projects. These rulers are thick enough to stand up to not being cut by the rotary blade, and their grid and varying sizes make them great for marking anything from hems to tote bag pocket placement.  (I also used a larger one for cutting planks when installing our new vinyl floor.)

5. See-Thru or C-Thru Gridded Ruler: I’m not sure of the real name for these, though I have a few brands (I think C-Thru is a brand).  They’re usually 2″ x 18″ (though I also have a 2″ x 12″) and can be found in the sewing notions department as well as the fine art department.  Besides seam gauges and regular soft tape measures, I’ve been using these the longest.  They have an 1/8″ grid, with 1/2″ and 1″ marks, and the outer edge shows 16ths.  Some even have holes running at 1″ intervals down the center for centering and drawing circles and scallops. These rulers aren’t as thick as rotary cutting rulers and are pretty flexible, making them useful for measuring curves.  I use these for marking fabric as well as for drafting and marking patterns.  They’re excellent for any drawing you may need to do and were an all-around staple in fashion school.  (I think I have 4 of these rulers throughout the house…I use them for papercrafting as well!)

6. Dritz Ezy-Hem: This one I’ve only been using for about 2 years, but I love it.  It’s an aluminum (or some kind of metal) ruler and guage that can be used while pressing.  I only pictured the front above, but the back (pictured here) is also full of lines for pressing hems.  I’ll do a separate post on using this ruler because I think pictures will show off it’s amazingness better than my words can.

Let me just say that in this and future posts, I will be showing you a lot of amazing tools and gagets that I use.  I have to tell you that I am not a millionaire.  I buy all these things when my local fabric (or craft) store has a good sale on notions or rulers or whatever, or online when there are sales, or when I get coupons from my local quilt shop or sewing machine dealer.  I make sure to sign up for all their fliers or email lists to be sure I know when the sales are going on or when the coupons are coming out.  That’s really the best way to stock up on all these cool things and save a little money (because as I’ve said, I usually have multiples of all these tools!)

Welcome!

Welcome to the Modern Seamstress!  I sew a LOT.  Like many other people, my mom used  to sew, but hasn’t in so many years that her memory of sewing is more than vague and at this point, she often has no idea what I’m talking about.  Both of my grandmothers were seamstresses but have passed away and none of my other family sews except one cousin who is two states and a time zone away.  Just the other day, I discovered for myself a new marking technique that hadn’t been specifically outlined to me by any teacher or book (to my recollection anyway), and I thought, where can modern seamstresses like myself turn for advice and tips and help in general?  

 I have been, however, fortunate enough to work with lots of women who sew:  women who have all kinds of experience sewing professionally and casually, women who quilt, women who sew gowns for ballroom dancing, women who regularly sew bridesmaids and prom dresses, women who sew dress shirts for their sons.   Personally, I sew quite a lot…bags, wedding gowns, quilts, home decor, the occasional pajama pant, etc…I’ve taken quilting classes and I’ve been to fashion school…so I have knowledge and experience from many fields of sewing that don’t often mix (dressmakers and quilters are two very different kinds of seamstresses!) which, coupled with the advice of my elders and peers have culminated into a wealth of information which I would like to share with all the modern seamstresses out there.  

I don’t think this site will be specifically for beginners, (though beginners are more than welcome, learning is learning, after all!) but probably more for those who already have taken on sewing as a hobby and are looking for tricks to make things go faster or more smoothly.  I think seamstresses old and new can always learn something, so I would love to hear your ideas and comments, and with any craft, I don’t think any one technique is set in stone.  I think techniques are always changing and evolving to fit your current project’s needs.  

My approach to sewing is based on practicality and simplicity.  I sew as a useful and economical outlet for my creativity, and in an attempt to carve a unique image for myself and others in this increasingly uniform world.  I think this is the same reason today’s modern seamstresses sew, so I give this site to you, Modern Seamstress.